
How to Repair Broken Marble
Broken marble can be repaired with a suitable resin when all the pieces are present and the damage has not reached a load-bearing area. Marble adhesive suits small pieces, fluid epoxy suits fine cracks, and colour-matched filler suits missing edges. The surface must be clean, dry and free of grease. For load-bearing areas such as heavy worktops, stair treads or facade stone, consulting a stone specialist is safer than attempting a repair at home.
Which Adhesive Should You Use for Marble Repairs?
The right way to bond broken marble depends on the damage. If two pieces fit together precisely, a polyester resin product made for natural stone can be used. Low-viscosity epoxy may give better results where the resin needs to penetrate fine cracks. For corners with missing material, choose a filler that accepts colour pigments.
Fast-acting marble and stone adhesive begins to work within minutes of mixing with its hardener. The product page specifies 1–3% hardener, a working time of 3–5 minutes and a hardening time of 6–9 minutes. For full strength, wait for the manufacturer’s final cure time rather than relying on initial hardening.
Epoxy can be chosen for marble repairs, crack filling and joining different materials. Clear two-component epoxy adhesive can resist impact, water and common solvents. If adding colour, test pigment compatibility with the resin on a small area.
How to Repair Broken Marble Step by Step
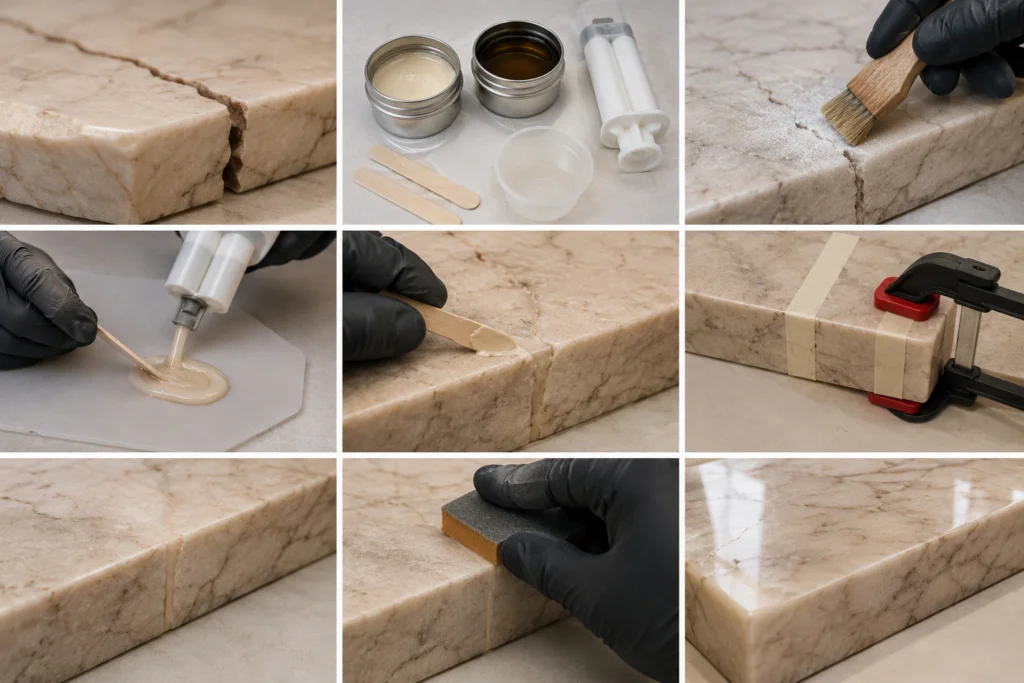
First, fit the broken pieces together without adhesive. Check that the edges match, no sections are missing and the piece does not rock. Remove dust with a soft brush. Wipe greasy surfaces with a cleaner suited to natural stone and let them dry completely. Do not use acidic cleaners, as they can dull marble. Prepare the adhesive using the mixing ratio on the packaging. Spread the mixture onto one of the two surfaces with a thin spatula. Align the pieces and secure them with paper tape or a clamp that will not scratch the surface. Carefully remove excess resin before it hardens. Avoid hard metal scrapers, which can scratch polished surfaces.
Wear nitrile gloves and ventilate the area. Measure resin and hardener according to the packaging ratio, rather than estimating. Extra hardener does not make the repair stronger and can cause discolouration, brittleness or uneven curing. A disposable container and wooden spatula can be used for mixing. Do not leave tape on polished surfaces for a long time. Do not pour leftover mixture down the drain; let it harden completely and dispose of it according to local waste rules. Keep children and pets safely away from the work area. Once repaired, leave the piece undisturbed at room temperature. Loading it too soon can open the bond line. When repairing a coffee table edge, do not use the furniture on the first day. Keep water, hot pans and cleaning chemicals off a repaired worktop section until curing is complete.
What Should You Do About Cracks and Missing Pieces?
Establish whether a marble crack is moving before repairing it. Stable hairline marks can be filled with resin. If a crack continues to grow, the stone flexes or a gap can be felt in the support beneath, surface filling will not last. Without strengthening the substrate, the repair may soon reopen. A small corner piece of a kitchen worktop can be repaired at home, but a large break around a sink, a stair tread or a large slab needs professional help. Colour differences may not disappear completely after a crack repair. Pigment close to the vein pattern and careful polishing afterwards make the appearance more consistent. If sanding is needed after an epoxy repair, protect the surrounding polished area with masking tape and work progressively with a very fine abrasive. Stop using the item if there is a deep crack, loose piece, sharp edge or loss of structural support.